


Creating a "Web App": Setting Up a Serverless Contact Form
I would like to get leads from my site too. Who wouldn't?

On my website, I wanted to set up a contact form. So after setting viewing my stunning pictures, visitors can reach out to have them, their brand, or whatever else’s pictures taken. My site is hosted statically on an S3 bucket, so there isn’t a good way to run a server-based form. The solution to this is the “serverless-form-handler” created by James Bewick. With this, I can receive emails from a contact form on my site with Amazon Simple Email Service (SES). I will also configure rate limiting to prevent abuse of this function with the API gateway.
Creating the Form
The first step before actually using the API Gateway, Lambda function, and more I had to set up the actual form that will go on the website. James Bewick specified most of the code in his blog, but a lot of changes needed to be made because he used Bootstrap CSS. His example looks like this:
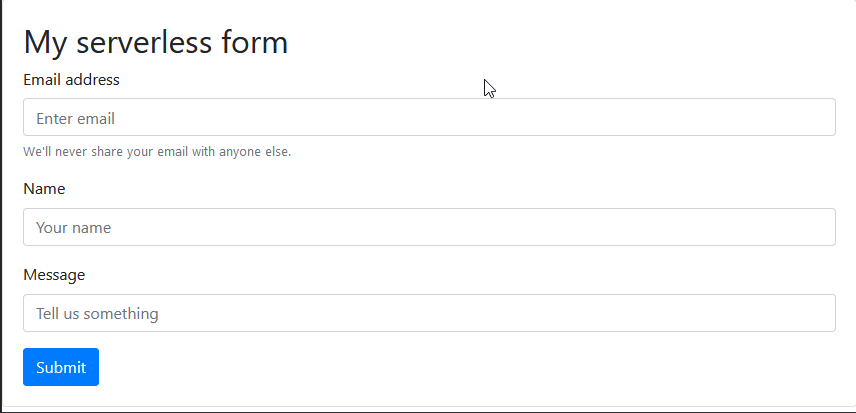
Originally I was going to use his template, but it imported Bootstrap CSS as a global stylesheet, which changed the style of the sidebar on the site and ruined the margins for mobile users. The first thing that has to be done is to make the Contact Form look visually appealing without using Bootstrap CSS. Here’s what I’m starting with without Bootstrap:

Looks awful doesn’t it? I don’t know about you but this would make me close my site immediately. The HTML can be kept for the input form, but many classes need to be changed. Here’s the HTML:
  <div class="card">
    <div class="card-body">
      <h2>Contact Me</h2>
      <form method="POST">
        <div class="form-group">
          <label for="email">Email address</label>
          <input type="email" class="form-control" id="email" placeholder="Enter email" style="width: 95%;">
          <small id="emailHelp" class="form-text text-muted">We'll never share your email with anyone else.</small>
        </div>

        <div class="form-group">
          <label for="name">Name</label>
          <input type="name" class="form-control" id="name" placeholder="Your name" style="width: 95%;">
        </div>

        <div class="form-group">
          <label for="message">Message</label>
          <input type="text" class="form-control" id="message" placeholder="Tell us something" style="width: 95%;">
        </div>

        <h4 id="response"></h4>
        <button type="submit" class="btn btn-primary">Submit</button>
      </form>
    </div>
  </div>
Only a few changes needed to be made to the classes that were provided by Mr. Bewick, but don’t be mistaken, these “few changes” took about 8 hours. Sorry, I’m not a developer.
.card {
        background-color: rgba(0, 0, 0, 0.7);
        color: #fff;
        max-width: 800px;
        margin: 20px auto;
        padding: 20px;
        border-radius: 10px;
      }

    .container {
      display: flex;
      justify-content: center;
      align-items: center;
      height: 100vh;
    }

      .card h2 {
        font-size: 24px;
        margin-bottom: 20px;
        font-weight: bold;
        color: #fff;
      }

      .form-control {
      display: block;
      width: 100%;
      padding: 0.375rem 0.75rem;
      font-size: 1rem;
      line-height: 1.5;
      color: #495057;
      background-color: #fff;
      background-clip: padding-box;
      border: 1px solid #ced4da;
      border-radius: 0.25rem;
      transition: border-color 0.15s ease-in-out, box-shadow 0.15s ease-in-out;
      }

      .form-control:focus {
      color: #495057;
      background-color: #fff;
      border-color: #80bdff;
      outline: 0;
      box-shadow: 0 0 0 0.2rem rgba(0, 123, 255, 0.25);
      }

      .form-group small {
      display: block;
      margin-top: 0.25rem;
      color: #6c757d;
    }

    .btn-primary {
      display: inline-block;
      font-weight: 400;
      color: #fff;
      text-align: center;
      vertical-align: middle;
      user-select: none;
      background-color: #007bff;
      border: 1px solid #007bff;
      padding: 0.375rem 0.75rem;
      font-size: 1rem;
      font-family: 'Poppins', sans-serif;
      line-height: 1.5;
      border-radius: 0.25rem;
      transition: color 0.15s ease-in-out, background-color 0.15s ease-in-out, border-color 0.15s ease-in-out,
      box-shadow 0.15s ease-in-out;
    }

    .btn-primary:hover {
      color: #fff;
      background-color: #0069d9;
      border-color: #0062cc;
    }

     .form-group {
        margin-bottom: 20px;
      }

      .form-group label {
        color: #aaa;
      }

      .form-group .form-control {
        background-color: rgba(255, 255, 255, 0.1);
        border-color: #fff;
        color: #fff;
      }

      .form-group .form-control::placeholder {
        color: #ccc;
      }

      .form-group small {
        color: #aaa;
      }

      .btn-primary {
        background-color: #1e90ff;
        border-color: #1e90ff;
      }

      .btn-primary:hover {
        background-color: #0069d9;
        border-color: #0062cc;
      }

      #response {
        margin-top: 20px;
        color: #fff;
      }
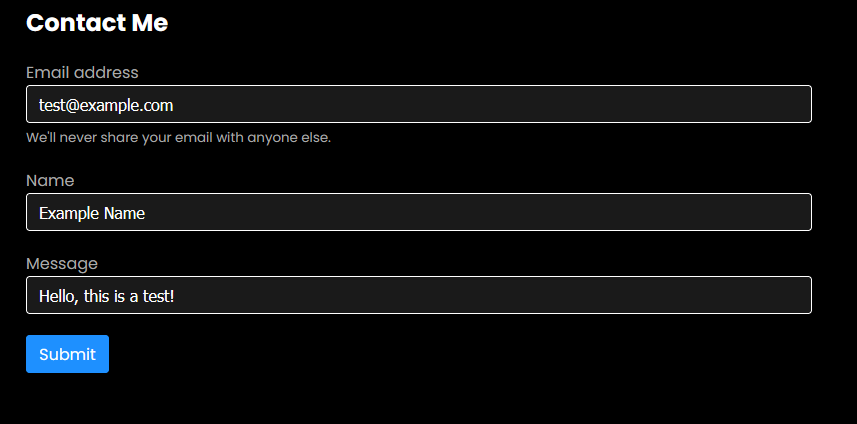
Looks good! I have to make a few minor tweaks, but this works for me. If you were to submit something at the moment you would get an error, so onto the real part.
Serverless Forms
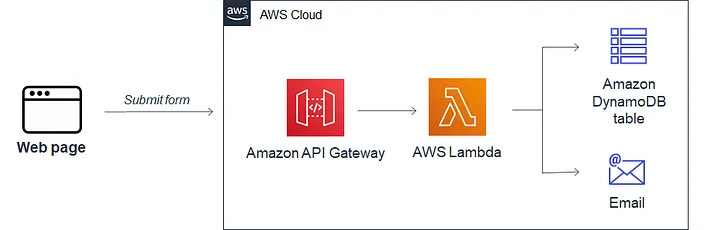
The app will create for resources:
Amazon API Gateway provides the HTTPS endpoint that our web page calls.
AWS Lambda parses the form data, stores the item, and sends the email.
Amazon DynamoDB is the database for storing the form data.
Amazon Simple Email Service (SES) sends the email.
As with any tutorial you’ve seen in tech, implementing this serverless app was not as easy as it seemed. Though the app is in the Serverless Application Repository (SAR) in AWS, the runtime for the app was still Node.js 12.x, which was deprecated by AWS in April. So there wasn’t a way to just plug and play this app. Luckily for me, I solve problems.

Since I already purchased my domain name, I created an Amazon Workmail organization for my domain and verified the email I created for SES. This will be the email that sends the information that is input into the contact form on the site. Next, I needed to create a Lambda Application, a Serverless API Backend to be exact.

This application is going to use the AWS Serverless Application Model (SAM) and not the SDK. Once connected to GitHub and created, I had to clone Mr. Bewick’s GitHub repo, to my PC and make some changes. This included changing the runtime, zipping and changing the URI for the Lambda function, and more.
#ADDITIONAL CODE ABOVE...
SubmitFormFunction:
Type: AWS::Serverless::Function
Properties:
CodeUri: s3://cf-template-serverless-form-submit/submitFormFunction/lambda.zip
Handler: app.handler
Runtime: nodejs16.x
MemorySize: 128
Environment:
Variables:
ValidatedEmail: !Ref ValidatedEmail
FormDataTable: !Ref FormDataTable
Policies:
- DynamoDBCrudPolicy:
TableName: !Ref FormDataTable
- SESCrudPolicy:
IdentityName: !Ref ValidatedEmail
Events:
HttpPost:
Type: Api
Properties:
Path: '/submitForm'
Method: post
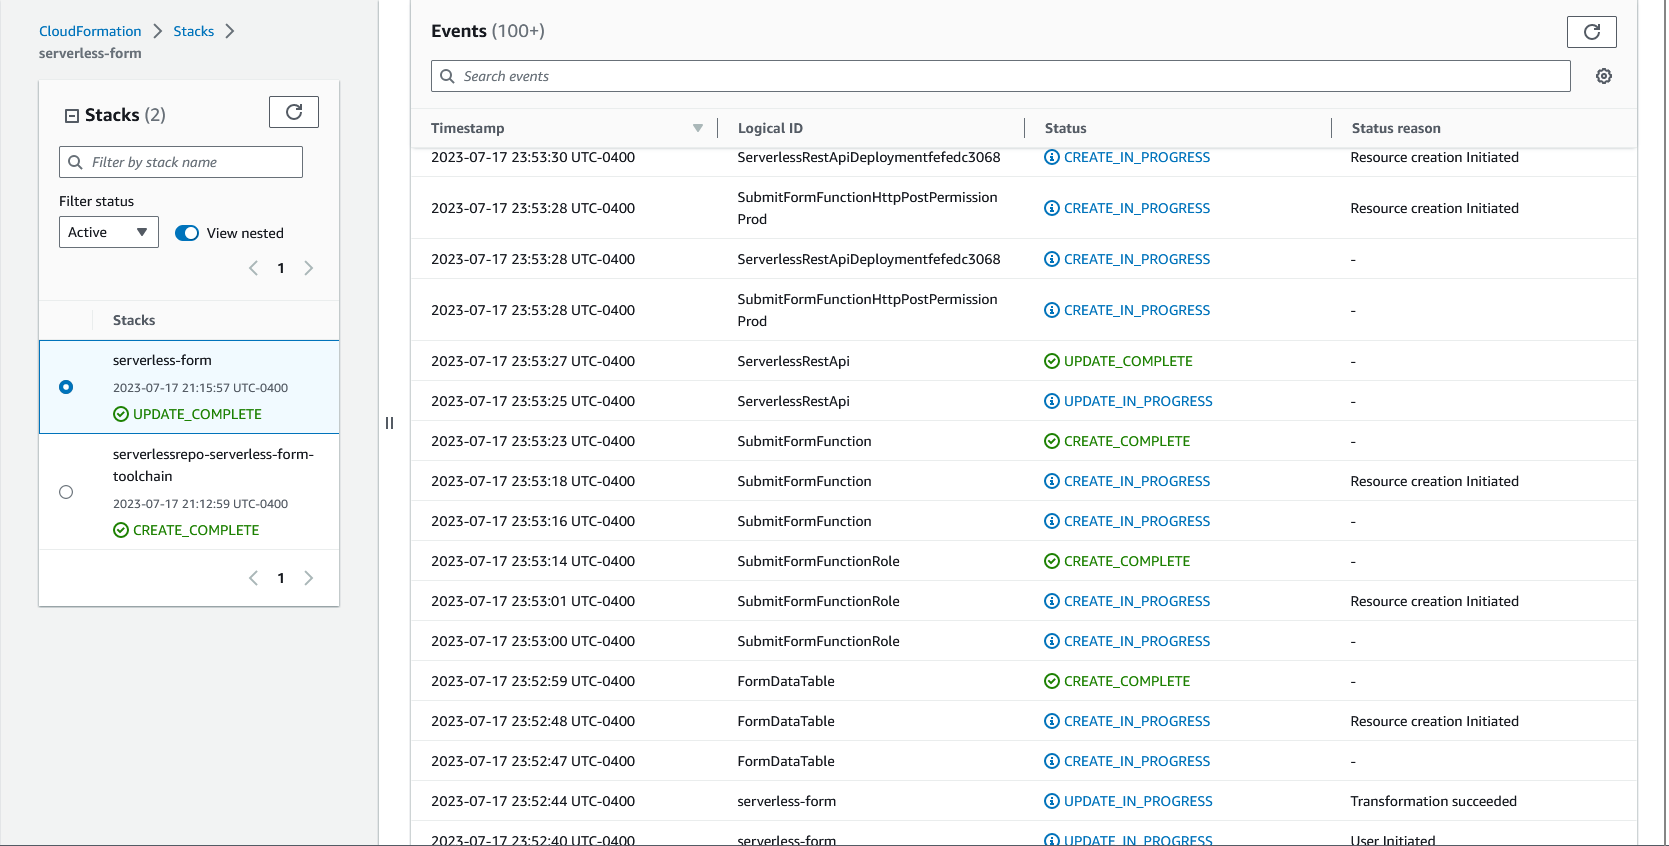
#ADDITIONAL CODE BELOW...I also changed the IAM policies attached to the CloudFormation IAM Role so that roles could be created and S3 objects could be accessed for the creation of these resources. An update to the CloudFormation stack and the application is being created.


After testing the form on the site, it seems to be working perfectly! Like I said, some of the HTML needs to be changed. But in terms of functionality, this is perfect.
Rate Limiting
This application/functionality is great, but this could still be abused by an attacker. The API doesn’t require any authorization in the request or an API key so I decided to configure rate limiting on the REST API to mitigate this potential abuse. I also decided to keep SES in a Sandbox to only allow 1 email per second and 200 emails per day. At the moment, I won’t be needing more than 200 emails to be sent to me in a day. Once I reach that point, I’ll be hiring.
This was the easiest step of this whole process. In the management console for API Gateway, all I had to do was configure my production API for a burst limit of 1, and a rate limit of 1 per second.

Then for the staging API, I set the burst limit to 0, and the rate limit to 0.

What’s Next?
This was a pretty essential piece of the site. This blog post says it is a 6-minute read, yet this took around 15 hours. Next, I need to do some cleanup of the fonts and minor tweaks. After that I’ll move onto a visit counter to put on the site, I might put the sidebar on the landing page with the logo too. We’ll see. Stay tuned for the next post!